Translate

Sunday, April 25, 2021

Csplice

 Introduction to the Csplice app.


Trial web version:

https://ghtapps.com/Csplice/


Contents:


FAQ Contents:


Quick intro video:


App opening screen:

(Splice list)


1) Enter a short splice description into input box.


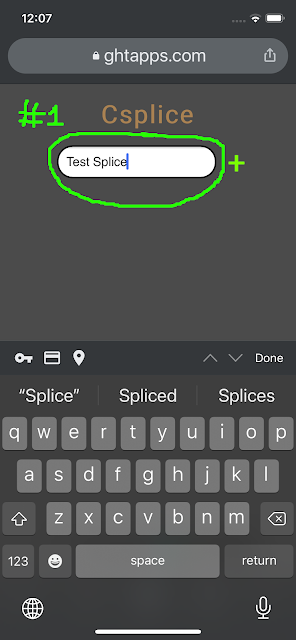
2) After Description is entered click the green "+" button (2A). This will create a new splice to work with. Then click the newly created button (2B). In this case the "Test Splice" button.


*Up to 10 splices can be saved. If an 11th splice is entered the bottom splice in the list is automatically deleted.


Second Screen (Cable count input)

3) Upon Clicking the newly created splice you'll be taken to an empty count input screen.


4) Enter a cable count in each input. Up to 10 cables can be entered per splice. Each cable will be designated a color block depending on which input you've entered the count.


5) Set grouping configurations on each cable. The default app splice is set to "12". Start from the left cable grouping input (blue cable) and work your way to the right. The blue cables grouping input will set all grouping configurations to the right of it for a quicker setup. Say you want to use the app for 25 pair copper counts. Enter 25 into the furthest left input and the app will set any un-entered grouping configuration to "25" also. 


6) Click the round gold button at the bottom right corner to put app into Csplice mode. If gold button is not visible you may have to pinch zoom the screen out.


6) The app is now in Csplice mode. The counts are compared against one another. If there's a matching count (case sensitive) the matching counts get a colored block indicating which cable you'll find its match in. You can now zoom in/out and scroll around to see the matching cable counts of all entered cables. If any of the cable count inputs had no cable counts entered they are automatically hidden from the screen.


Advanced

Cable Id picker:


Start by entering a cable Id and the app will go through all splice counts and look for any matching Id's that start with what your entering and display the top 3 possible matching (case sensitive) Id's to choose from.


Upon selecting a Cable Id from the picker the app auto completes your Id entry and places the comma separator for you. This feature cuts down on cable count entry errors and makes count entry a quick and easy process.


Filtering cables:


After the Csplice button is clicked the app will put check boxes in the upper left corner of each cable entered.


Checking a box will filter out all non-matching cable counts and display only the cables that have matching counts with only their groups that match.


When filtered you may get another cable color block included. This is to be expected. This lets the user know that that feed ribbon also has some count that is spliced to the orange cable. Notice the whole group count is preserved for easy counting of the 53rd "12 fiber ribbon".


Cable notes:

After a cable count has been parsed using the "Parse Cable" button or the app is put into Csplice mode using the round gold button, short cable notes can be added to the cables and are preserved for the next time you open the app. This way you the user needs to see the calculated fiber count before being able to add a note.


If at any point a cables count is edited the short note is removed and the user will need to enter the note again after the calculated fiber count is once again shown.


Say It button:

The "Say It" button is only operational while the app is in edit mode. This feature allows the app to read back the cable count the user has entered so that the user can look at their prints while the app reads back the count to verify counts are correctly input.


CC button:

For customers who may already have my Fiber Optic Color Code or 25 Pair Color Code app make sure you've got the latest version installed.


Clicking on a cables CC button opens either my Fiber Optic Color Code app or the 25 Pair Color Code app depending on the group configuration the Csplice's cable is set to. Group configurations set up for copper in either "25", "25-1", "100-25
", "100-25+", "600-25", "2400-100-25" are sent to the 25pr CC app. All other configurations are sent to the FOCC app.


When the CC button is clicked in the Csplice app the corresponding Color Code app is opened with the selected cable count automatically entered into the Color Code app. User will still have to configure the Color Code app according to their cable needs.


From within the CC app the user can search for the item as usual by cableId,pair or 
cableId,fiber


Resulting Color Code search


Deleting a Splice:


Select the red "-" button of the splice you want to delete.


User is presented with a confirmation alert of the splice they want to delete.


Splice is deleted after confirmation.


Advanced Use (Section throws):

Scenario:
You are the lead splicer on a job (see combined job prints image below) that has 2 feed cables from the south (print 1) @ the splice on 84th & Lazy Ln. With 3 lateral cable cuts (prints 2-4). Print 5 has an inner office section throw. And print 6 is an additional feed cable from the north.

All feed cables are going to be combined into 288F cable (thick black cable on image) with the new laterals that cut over to the existing customer lateral cables (skinny black cables) on a night cut.

You will work the splice on Print 1 (circled blue). There are 2 feed cables (blue and orange) and one out cable (green). All new "C" splices (colored cables spliced to thick black cable) have been done according to the print prior to the cut and you have splicers at all cut splices (black circles) waiting on you on Print 1 and Mike on Print 6 (feed cables) for instructions for when to cut their fibers.

App set up:

Enter your splice with your feed cables to the left in the Blue and Orange columns with your out cable in the Green column. This will show you your splice like normal in the app.

Next enter the 3 new customer lateral cables on prints 2 thru 4 (brown, slate & red cables) in the Brown, Slate and Red columns. The reason for entering the new cables is because the techs that are splicing the laterals are responsible for correctly building their splice. Your only concern is to know which ribbons/fibers in your splice goes to which ribbons/fibers in your splice and which splice outside of your own that it affects.

Next enter the new inner office lateral cable on Print 5 (Yellow cable) into the yellow column. This is the same type of cut as the customer laterals just mentioning it as an inner office cable for the scenarios sake. And finally enter Mikes out cable (violet cable) into the violet column.

If Mike were to use the app he would enter his whole splice, all new laterals, and your out cable. 

If the techs working on the laterals were using the app they'd enter their splice and yours and Mikes out cables. 

Now you can filter the Csplice app as needed. Let's say you want to work the inner-office lateral with Joe on Print 5 while Mike works with Bill on print 2. You'll put a check mark on the Yellow cable and Mike will put a check mark on the Brown cable.

When you filter out all non-yellow cables by checking on the yellow cable your left showing ribbons 1-4 from the feed cable (blue column) that get spliced to ribbons 3-6 of your out cables (green column) with the filtered on matching yellow cables ribbons & yellow blocks.

To work with another tech uncheck the yellow cable and check the techs cable your working with's cable for the same cable filtering capability results.

*Some times you'll get matching dead counts while using the Csplice app in this way. This is a residual effect of matching counts and can be ignored. If your splice has matching feed counts put them together in your splice.  Dead count being pushed depend on the splices that are between the 2 cut locations. If the counts match in the new "C" splices they'll make it to where they belong or end at where ever the designing engineer has them end at.

**Note that for the active counts to make it to their far ends they must be spliced and pushed correctly in the the new "C" splices. We are relying on the engineer to have built the splices correctly on the prints to make it from A-Z. Before the day of the cut make sure the counts flow through the pre-built new splices.


Combined print example


Cable Counts example


Whole Job Csplice mode


Yellow inner-office cable filter applied


FAQ:


How can I edit cable counts after Csplice has ran?

Clicking any one of the apps Clear buttons 2x after entering into Csplice mode will put the app back into editing mode. Or optionally clicking the back button to the "Splice list" screen and reopening the splice will let you edit the splice also.


Round gold button is Missing?

If the round gold button is missing and you haven't clicked it into Csplice mode try pinch zooming the screen. Another option is to click your back button to return to the splice list screen and open the splice you are working on again.


The empty checkbox will not let me put a check into it?

If the check boxes are not selectable make sure that all cables have been parsed. Another possibility is that if there are no colored matching count blocks in that cables parsed count there are no cables for the app to filter to. The app does not allow you to filter on a no matching counts cable.


Does this app work with counts that use a colon as a separator?

Yes. Instead of using a comma in your count simply use a colon.


Sunday, June 21, 2020

Input Cable Count

How to enter cable counts for the Fiber Optic Color Code app.

1) Select the cable type you have from the bottom right circular button of the main screen. 


2) Select 'Input Cable Count' from the top right menu dropdown of the main screen. 


3) We are now in the Cable count input screen.

#1 Cable fibers entered / selected cable types maximum fibers
#2 General Cable count input box w/ double space auto punctuation
#3 Three selectable positions to save a cable count to.
#4 Speed Counts: a convenient cable id auto completer w/ double space auto punctuation
#5 Task buttons
#6 Cable count break down text field and warning message area.
#7 Cable type selector.


4) Entering a Cable count into the #2 "General Cable count input box".

4a) Start by entering a Cable Id.

4b) Double tapping the space bar will automatically put a comma after the Cable Id (convenience option) or manually enter a comma.

4c) Enter low count value. Notice that the #1 Fiber Counter is now 1/1728 and the red Cable Count verification dot is Green. This is a valid count for the app input. (You could tap the spacebar 4x or your keyboards carage return button to start a new line of count)

4d) A Double tap of the space bar after the low fiber range will automatically place a dash "-" symbol after the low fiber range. Notice this is now an invalid line of cable count by the Red dot and ---- in the #1 fiber counter.

4e) Enter high count value. The green dot is back and total fiber count is now 24 fibers a indicated by the #1 fiber counter.

4f) A Double tap of the space bar after your line of counts high range will drop the cursor to a new line. Or done  manually by the keyboards carage return button.

4g) Repeat 4a-4f to enter the rest of your count. Keeping track that the #1 Fiber Counter is at or below the maximum for the cable type selected and the cable count input validation dot is green. If they are not, check the last count you entered for errors.

 If you are missing a cable id, comma or your high fiber range count is less than your low fiber range, on any of the lines, the dot will stay red and your fiber counter will display ----. So, as you enter a line of count always verify that both those checkers are valid.

 If Your total fiber count is greater than the max size for the chosen cable the dot will turn red and the fiber counter will show a number greater than the max input for the chosen cable type. 


5) Entering a Cable count using the #4 "Speed count input box".

5A) Start by entering the Cable Id.

5Aa) If there is a cable Id in the #2 "Cable count input box" that starts with the same letters/numbers you are entering you will get a pop-up cable Id convenience selector.

5Ab)  Selecting one of the pop up options will auto complete your chosen cable Id and place a comma for you. 

**Step 5Aa above is the main purpose of the "Speed Counts" input box. So if you have multiple lines of count and the cable Id's are a bit long. The Cable Id pop up will conveniently fill the Cable Id in for you. Once you have the cable Id and comma entered the rest of the steps are the same as the general input box.


5B) Double taping the space bar will put a comma after Cable Id (convenience option) or manually enter a comma.

5C) Enter low count value.

5D) Double space for a dash "-" (or 4 spaces to complete this line of count).

5E) Enter high count side of fiber range.

5F) Double tap space bar to push this line of count into the #2 general Cable Count input box.

5G) Repeat 5A-5F for entering more lines of cable count.


#5 Task Buttons:

6a) Say It button: 
Is used to read back the cable count that is in the General cable count input box. This is helpful for verifying the count you entered matches the count on your prints. Listen along as you look at your prints for input correctness.

6b) Parse Cable button: 
This will break the count you entered into readable groups of fibers based on the cable type you've selected. The text area that this is displayed is in the #6 region

 6c) Clear button: 

    6cA) A short click will clear the "Parse Cable" buttons text that is displayed in the #6 area.

    6cB) A long click will delete what is visible in the #2 "General Input box". 

    6cC) A long click, If one of the "Save to position" radio buttons are selected and the count that is visible in the General Count input box matches whats saved in the "Save to position", that positions memory of that saved count will be wiped clean/deleted. And the Saved to position will now become vacant to use for a new count.

6d) Color Code button:

    6dA) With an empty cable count input. The app will return to the main fiber color code screen.

    6dB) With a cable count entered. When the #1 fiber counter is less than or equal to the max cable types size and the Validation dot is green in the #4 cable count input box, the app will open to the color code screen with the currently visible cable count. And if a #3 "Save to position" radio button was selected the count entered will be saved to that position for future use.


#4 Save to Position radio Buttons

7A) You have 3 positions to save a cable count to. Cable counts do not need to be saved. But for convenience of returning to the count at a later time, a sudden app crash in the color code screen, or the user clicking their devices back button while in the color code screen will all likely clear the cable count you are working with and you'd have to re-enter it again. But if saved can be easily recovered.

7B) Cable counts are saved by having a valid count entered, a saved to position selected and a click of the "Color Code" button.

7C) Cable counts are deleted by:
 1)having a blank #2 "General Input Box"

 2) Select a saved count position (which will now fill the previously empty #2 "General Input Box" )

3) A long click of the "Clear" task button.

7D) If all count positions have cable count in them you will have to decide which count you want to clear. Clicking a saved position, while the input screen is clear of any count, will show the count that is saved to that position in the #2 "General Input Box".

7E) Clicking a saved position, while the input screen has a newly entered cable count, will show the count that is saved to that position in the #6 region as a warning that the new count will over write the currently saved positions cable count when the "Color Code" button is clicked.