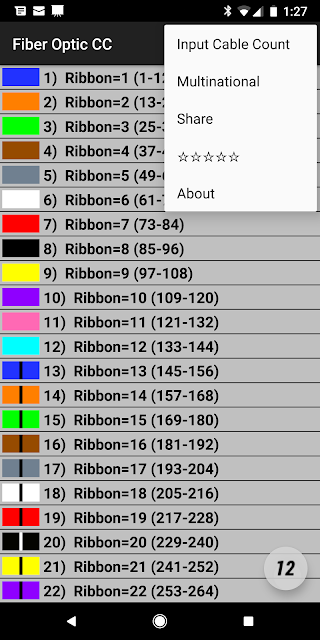
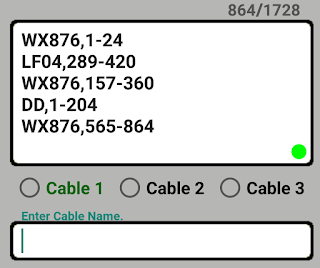
2) Select 'Input Cable Count' from the top right menu dropdown of the main screen.
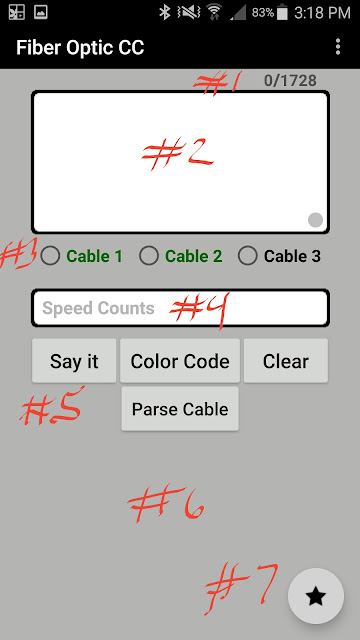
3) We are now in the Cable count input screen.
#1 Cable fibers entered / selected cable types maximum fibers
#2 General Cable count input box w/ double space auto punctuation
#3 Three selectable positions to save a cable count to.
#4 Speed Counts: a convenient cable id auto completer w/ double space auto punctuation
#5 Task buttons
#6 Cable count break down text field and warning message area.
#7 Cable type selector.
4) Entering a Cable count into the #2 "General Cable count input box".
4a) Start by entering a Cable Id.
4b) Double tapping the space bar will automatically put a comma after the Cable Id (convenience option) or manually enter a comma.
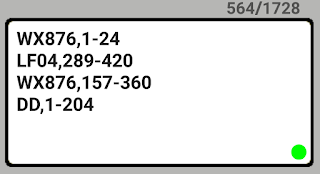
4c) Enter low count value. Notice that the #1 Fiber Counter is now 1/1728 and the red Cable Count verification dot is Green. This is a valid count for the app input. (You could tap the spacebar 4x or your keyboards carage return button to start a new line of count)
4d) A Double tap of the space bar after the low fiber range will automatically place a dash "-" symbol after the low fiber range. Notice this is now an invalid line of cable count by the Red dot and ---- in the #1 fiber counter.
4e) Enter high count value. The green dot is back and total fiber count is now 24 fibers a indicated by the #1 fiber counter.
4f) A Double tap of the space bar after your line of counts high range will drop the cursor to a new line. Or done manually by the keyboards carage return button.
4g) Repeat 4a-4f to enter the rest of your count. Keeping track that the #1 Fiber Counter is at or below the maximum for the cable type selected and the cable count input validation dot is green. If they are not, check the last count you entered for errors.
If you are missing a cable id, comma or your high fiber range count is less than your low fiber range, on any of the lines, the dot will stay red and your fiber counter will display ----. So, as you enter a line of count always verify that both those checkers are valid.
If Your total fiber count is greater than the max size for the chosen cable the dot will turn red and the fiber counter will show a number greater than the max input for the chosen cable type.
5) Entering a Cable count using the #4 "Speed count input box".
5A) Start by entering the Cable Id.
5Aa) If there is a cable Id in the #2 "Cable count input box" that starts with the same letters/numbers you are entering you will get a pop-up cable Id convenience selector.
5Ab) Selecting one of the pop up options will auto complete your chosen cable Id and place a comma for you.
**Step 5Aa above is the main purpose of the "Speed Counts" input box. So if you have multiple lines of count and the cable Id's are a bit long. The Cable Id pop up will conveniently fill the Cable Id in for you. Once you have the cable Id and comma entered the rest of the steps are the same as the general input box.
5B) Double taping the space bar will put a comma after Cable Id (convenience option) or manually enter a comma.
5C) Enter low count value.
5D) Double space for a dash "-" (or 4 spaces to complete this line of count).
5E) Enter high count side of fiber range.
5F) Double tap space bar to push this line of count into the #2 general Cable Count input box.
5G) Repeat 5A-5F for entering more lines of cable count.
#5 Task Buttons:
6a) Say It button:
Is used to read back the cable count that is in the General cable count input box. This is helpful for verifying the count you entered matches the count on your prints. Listen along as you look at your prints for input correctness.
6b) Parse Cable button:
This will break the count you entered into readable groups of fibers based on the cable type you've selected. The text area that this is displayed is in the #6 region
6c) Clear button:
6cA) A short click will clear the "Parse Cable" buttons text that is displayed in the #6 area.
6cB) A long click will delete what is visible in the #2 "General Input box".
6cC) A long click, If one of the "Save to position" radio buttons are selected and the count that is visible in the General Count input box matches whats saved in the "Save to position", that positions memory of that saved count will be wiped clean/deleted. And the Saved to position will now become vacant to use for a new count.
6d) Color Code button:
6dA) With an empty cable count input. The app will return to the main fiber color code screen.
6dB) With a cable count entered. When the #1 fiber counter is less than or equal to the max cable types size and the Validation dot is green in the #4 cable count input box, the app will open to the color code screen with the currently visible cable count. And if a #3 "Save to position" radio button was selected the count entered will be saved to that position for future use.
#4 Save to Position radio Buttons
7A) You have 3 positions to save a cable count to. Cable counts do not need to be saved. But for convenience of returning to the count at a later time, a sudden app crash in the color code screen, or the user clicking their devices back button while in the color code screen will all likely clear the cable count you are working with and you'd have to re-enter it again. But if saved can be easily recovered.
7B) Cable counts are saved by having a valid count entered, a saved to position selected and a click of the "Color Code" button.
7C) Cable counts are deleted by:
1)having a blank #2 "General Input Box"
2) Select a saved count position (which will now fill the previously empty #2 "General Input Box" )
3) A long click of the "Clear" task button.
1)having a blank #2 "General Input Box"
2) Select a saved count position (which will now fill the previously empty #2 "General Input Box" )
3) A long click of the "Clear" task button.
7D) If all count positions have cable count in them you will have to decide which count you want to clear. Clicking a saved position, while the input screen is clear of any count, will show the count that is saved to that position in the #2 "General Input Box".
7E) Clicking a saved position, while the input screen has a newly entered cable count, will show the count that is saved to that position in the #6 region as a warning that the new count will over write the currently saved positions cable count when the "Color Code" button is clicked.
